
5 Keys to Upgrading Obsolete Manufacturing Test Systems
When failure of an obsolete test system is imminent, proper test equipment design can be stressful. Here are some tips to maximize the success of the development and changeover of the new test system (including test stands and test benches).
We’ve got a very similar webinar on this topic if you’d prefer to watch as opposed to read. See here: Upgrading Obsolete Manufacturing Test Systems Webinar. If you just want to see how we can help with updating your obsolete test system, see Test System Migration – replacing and upgrading obsolete test systems.
In our experience, test systems typically go obsolete after about 10 to 25 years of use.
Reasons To Upgrade
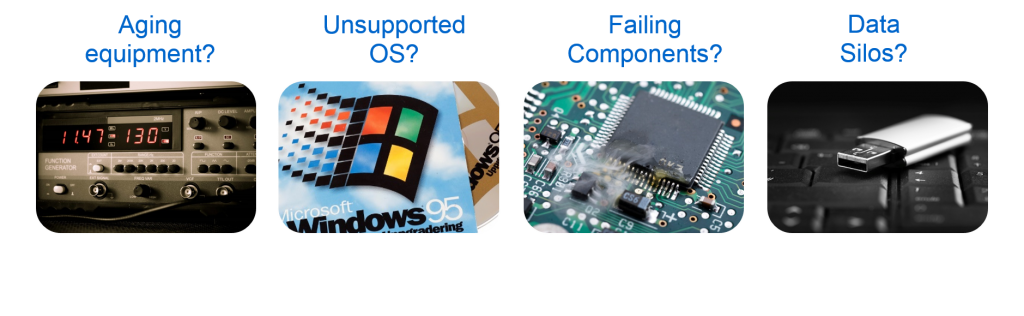
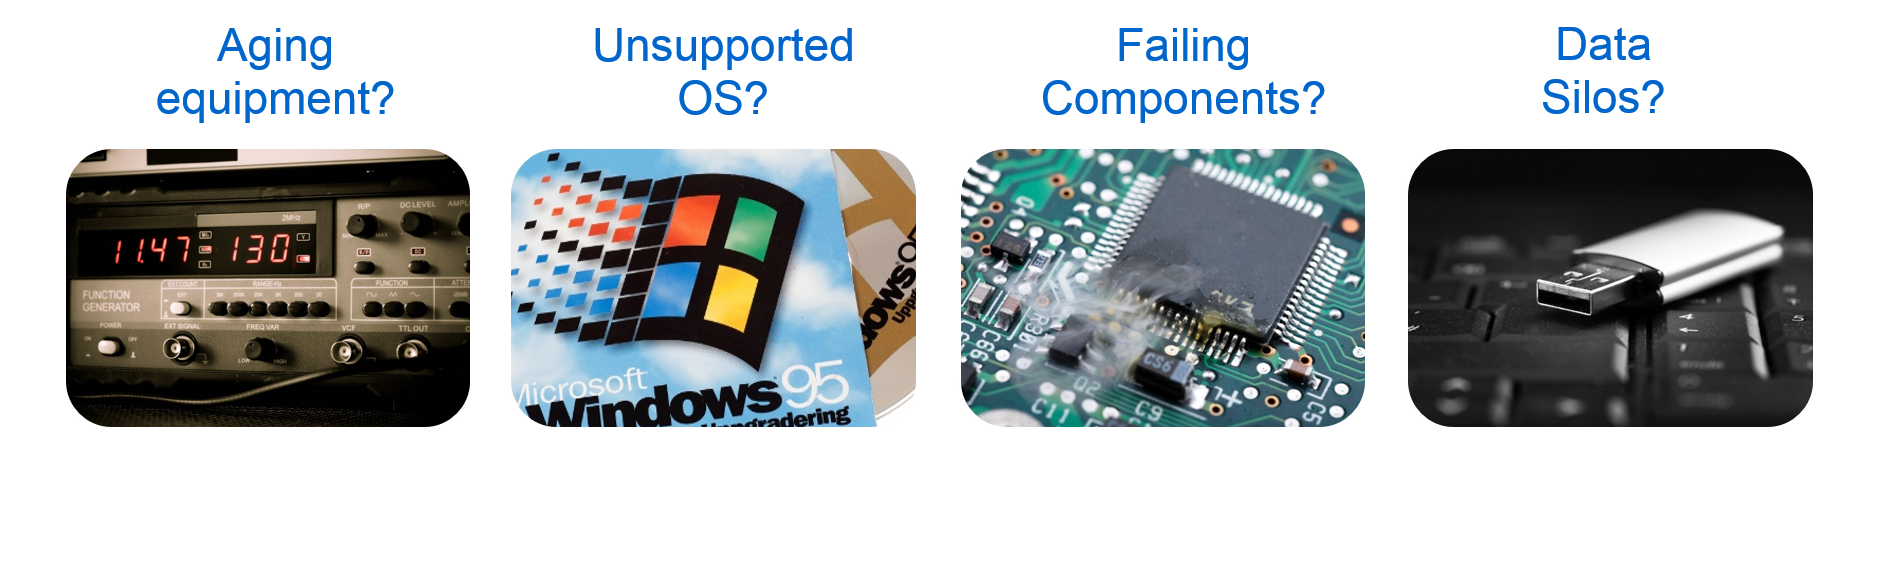
Obsolescence can be due to SW or HW or both. Some typical reasons to upgrade an obsolete test system include:
- Old/failing hardware – The one thing that pushes most companies to consider upgrading their obsolete testers is old hardware. Here, the test system uses old hardware components that are possibly irreplaceable, or are inadequate for the next generation product or are just plain are broken. Old hardware components could be computer equipment, measurement devices, stand-alone controllers, sensors, or actuators. The failures could be electronic or mechanical.
- Old Operating System – Another big reason for companies to upgrade is that the tester operating system is out of date and no longer supported. Often, the IT department wants to upgrade the OS for security and support reasons. And, sometimes upgrading obsolete hardware forces an upgrade to the OS, since the drivers for the new hardware won’t work with the old OS.
- Manufacturing Improvements – to provide better access to test data for the manufacturing and quality teams. Usually, an older tester tends to be a disconnected island, not easily sharing data with any other system. A manufacturer may want to improve some product designs or manufacturing processes by analyzing the test data. Alternatively, they may want to speed up manufacturing and the existing test system is too slow. Decreasing test time might be achievable by installing a new PC, new measurement hardware, new software, or some combination of all of these things.
- Old Software Development Environment – when there’s a desire to make modifications to the software in an old application in order to add functionality. But, often, the development tools are lost. So, you have to upgrade the development tools, and that usually starts a cascade of other reasons to upgrade, such as hardware drivers.
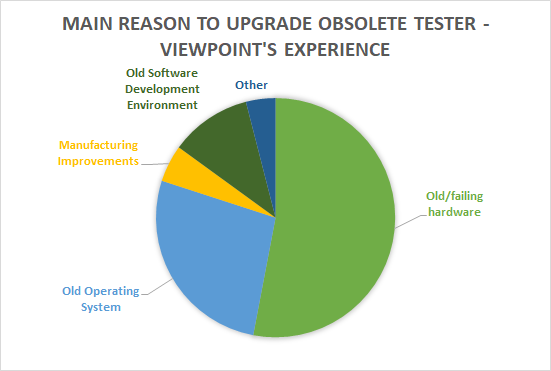
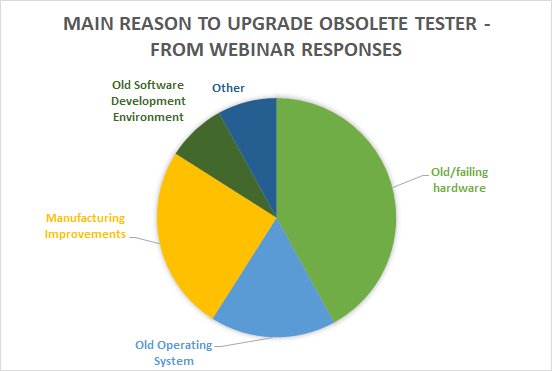
Here are two charts illustrating the most pressing reason to upgrade an obsolete test system, first from our experience, and then from responses we received from a webinar that we presented on this topic.
Poll – Test engineering leaders: What would help you most? Vote and see how your peers voted!
Insight #1: When a Duct-Taped Tester Makes Sense

It’s pretty typical that a company starts to consider upgrading an obsolete test system when a component starts to fail or becomes hard to replace. When that happens, you have two choices: either get around the troublesome part(s) by patching the test system or you can replace the entire test system. Our experience shows that most companies start by patching, using a little quote-unquote “duct tape” to make the system operational for a few more months or years. There is absolutely nothing wrong with this “duct-tape” approach (also called staged upgrades) if it is done with some thought and planning.
And, our experience shows that if a company has used duct-tape once, they will likely use duct-tape again. That’s fine and with some thought and planning, it’s worth keeping some components of the old tester. Eventually, you will want to go down the other path of complete replacement. But, maybe you don’t want to keep duct-taping and you’d rather plan for a complete upgrade now.
How do you decide which path is best and when to follow it? You need to review the life cycle of the tester components to see if a duct-tape solution is viable and reasonable. This review will help you prioritize the upgrade needs. Likely you will find some parts of the test system that should be given a priority during the upgrade versus others parts that can be delayed or reduced in scope.
For example, maybe the IT department wants you to upgrade the OS. After analysis of the hardware components, you find that hardware is going to be available for a long while and, better yet, drivers for this hardware are still available. So, with some minor patching of the test application software, you’ll be able to keep the rest of the tester and not have to upgrade the entire system.
On the hardware side, the number of spares you have at hand will affect your decisions too, since you might be able to handle replacement of an obsolete component for many years. Or perhaps you can make a last-time-buy of any component going end-of-life.
Pay attention to any interactions between the tester components.
For example, upgrading that obsolete analog input card might cause you to have to upgrade the OS which might cause you to upgrade the PC, and so on. Think through the upgrade path for each component being replaced.
And you should match the life cycle of the tester with the life cycle of the products being tested with the tester. For example, there’s no point in upgrading the tester if the only product being tested on it is not going to be manufactured anymore. The point here is to consider how long you might be able to make each component last in order to prioritize your upgrade path.
A little duct tape might be just the thing to do the trick!
Insight #2: The Importance of Reverse Engineering Skills

Let’s discuss the most important part of any obsolescence test system upgrade, which is the reverse engineering step. If you are extremely fortunate, the builders of the existing test system will have left comprehensive, up-to-date documentation, complete with:
- system design details
- bill of materials listing all components (and their versions),
- wiring schematics
- an acceptance test procedure coupled with results of executing that procedure
- And so on.
Oh, all that documentation is correct too. Even if it has redlines and markups, the people who built the existing test system documented all of it! I’ve never seen such a situation – it’s rare at best – so, the system usually needs to be reverse engineered.
Especially important in any Reverse Engineering process is attention to detail.
Anyone involved in this activity needs to be especially thorough and well-organized (i.e., anal).
A seemingly inconsequential item can result in unexpected behavior in the new system. Let’s talk though some important parts of a test system that need to be considered for a successful reverse engineering effort. We could spend hours talking about reverse engineering, it’s that important. But, I think I can give you a good overview here.
Signal Path
You want to look at everything the signal is subject to starting with the sensor and ending with A/D values. You’ll want to consider information such as:
- Sensor models and types.
- Signal level and bandwidth.
- Connection interfaces to the unit under test
- Wire types: are they shielded and/or, twisted pair. And what is their gauge?
- Signal conditioning. What are the specifications? Are any sensors actively powered?
- Digitizer specifications such as acquisition rates, bits, effective bits, differential or single-ended, filtering, isolation, and so on. The same applies to analog outputs.
Operating Conditions
How is the test stand used?
- Any environmental conditions, such as the temperature range, which can affect the equipment, including the sensors.
- And understand how the sensors are used: are they subject to heavy vibration, spattered with hot oil, cold air, and so on.
Signal processing and analysis algorithms
How is the measured data processed?
- You need to determine the details around any processing applied to measurements as they are combined, crunched, and converted into test results.
Test pass/fail algorithms
Understand how the UUT is assessed.
- For each test step, describe the procedure used to decide whether a UUT passes or fails.
Operator UI
Should you keep the original UI or change it to enhance the User Experience?
- If you keep the user interface as is, the operators don’t need to be retrained. But maybe you want to enhance the UI for better usability experience.
Configuration and test data formats
You need to review every type of file ingested or produced by the existing test system.
- Configuration files may give insight into the use of the equipment and the data processing and analysis algorithms. Configuration files might contain test step setup, equipment setup, or test sequence definitions.
- If you have *a lot* of configuration files, such as test sequences, consider whether it makes sense to convert over or re-use any configuration files in the new test system.
- Find out if the existing test results should be converted to a new format or will the format need to stay the same in order to be compatible with downstream data analyses or storage?
Prepare for differences
Be ready for differences between results obtained from the old and new systems. This topic is big enough that it gets it’s own section later in this paper.
And, most of all, remember that detail is important! Don’t assume anything.
Let me give some brief examples which illustrate the need for details. Viewpoint Systems has learned the hard way that you *really* need to be diligent in this Reverse Engineering step. Here are three representative examples of obsolete test systems that we’ve reviewed:
- An automotive manufacturer had a test system that used a 5B module for isolation. The new system hardware has built-in isolation, but the 4 Hz filter of the 5B will be missing. What might that change affect?
- A photonics manufacturer has an application which averaged 100 measurements to boost the signal to noise ratio. We had a hint that this might be happening since the input signal was so noisy. Will better wiring practices help?
- GE had an old DOS-based test system with a complex UI. The desire is to not have to retrain the operators on a new UI. Can that same UI be mimicked in Windows?
These examples show that reverse engineering is challenging with varied considerations and design paths. How will you know the best path forward? Don’t make assumptions – ask questions!
Insight #3: How to Minimize Impacts To Production

It would be awesome if replacing the old test system with the new tester was as simple as:
- Disconnecting some old wires,
- wheeling the old tester away,
- then wheeling the new one in its place, and reconnecting the wires.
- After a quick check to verify operation, you’re all done in less than 1 hour. And, the manufacturing supervisor won’t even care, since you did it over a shutdown.
In reality, though, production will be impacted.
Our experience is that the cut-over between old and new testers can be as little as 1 day and as much as few weeks.
Of course, during this time, the manufacturing people will be breathing down your proverbial neck the whole time. Thus, it’s important to understand the impact to production and ways to minimize that impact.
In easy situations, the existing test system can be quickly put back into production if the new tester has issues. In difficult situations, the old tester is an integral part of the production line. Removing it is a laborious process and it’s practically impossible to return it to operation. For these situations and everything in between, the best method to reduce production impacts is to do as much debugging as possible before the cut-over.
Let’s review a few ways to make sure that the new tester is as debugged and verified as reasonably possible prior to replacing the old tester.
Simple Swap
For a simple swap, debugging and verification should typically include the following items.
- Connect to the same network that will be used in production, to identify any IT connection and security issues.
- Connect to any production databases or folders for those same reasons.
- Run tests on some parts, even if only partially tested and even if done by hand. You want to catch any hiccups in using the tester. Of course, some parts of the tests might not be feasible without the rest of the test system ecosystem, such as that environmental chamber which production is always using.
Difficult Swap
Now, when you need to tear out the old tester, and it’s very difficult to put the old tester back into to service, you will clearly want to debug the new tester *very* thoroughly before that tear-out starts. It’s critical that the new tester work before you pull out the old tester. In this case, debug includes at least the following:
- Connect to the same network that will be used in production, to identify any IT connection and security issues.
- Connect to any production databases or folders for those same reasons.
- Run tests on some parts, even if only partially tested and even if done by hand. You want to catch any hiccups in using the tester. Of course, some parts of the tests might not be feasible without the rest of the test system ecosystem, such as that environmental chamber which production is always using.
- Create a simulation system that includes detailed simulations for all interactions with the product, fixturing equipment, signal, and production line. The time and cost of this effort can be substantial, but invaluable to debug how the new tester will operate as if it were connected into the actual production line.
- Consider digitizing actual signals from the existing tester to playback into the new tester for a realistic simulation. This approach is especially important if you have signal paths that are hard to decipher. Digitize these signals just prior to the A/D and, if possible, at the sensor, so you can simulate various parts of the signal path. Then, you can playback real signals to simulate a UUT, production line sensors, and so on during debug of the new test system.
- Get operator feedback on the UI to be sure they’ll be happy with it before they have to start using it for real.
- Push data into the ERP/MES results database or folders and/or reports to see that downstream analyses and reports work properly.
In addition to these debugging steps, two other items should be considered that apply to both scenarios. First,
use your estimate for the time it will take you to bring up the new tester and double or even triple it,
because things never go as easily as planned. Tell production management about this downtime. They may want to consider an inventory build-up to buffer any unexpected production outages.
And, if the new test system needs to undergo a re-certification that involves sign-off by the end-customer (often seen for the production of military or aerospace components), be sure to engage them prior to placing the new tester into the production line. This engagement is important because
re-certification can be a significant portion of the overall upgrade of the test system effort, sometimes as much as 50% in our experience.
Insight #4: Old vs New – How To Prepare For Differences

Hardware Differences
Let’s assume that the new system has been debugged and we are ready to validate it’s operation.
One of the most perplexing outcomes after installing a new test system is explaining the different results between the old and new testers.
Not every obsolescence upgrade shows these differences, of course, but enough do that it’s worth discussing ways to prevent or at least reduce the resulting confusion. Note that this review of the possible differences induced by the changes in old and new hardware and software should be done in the reverse engineering stage.
Some examples from actual upgrade projects will help describe the issues:
- A customer had an old manual tester where the operator was writing down the readings on several panel meters. These panel meters had built-in analog lowpass filters to stabilize the visual display whereas the new system used high speed analog digitizers and was much more responsive. The manufacturer was stunned how the reading “bounced around”, which of course was due to noise in the signal. We ended up implementing a digital lowpass filter on the digitized data to average out the noise.
- At another client, the old tester and the new tester had consistently mismatched readings. Turned out that the calibration on the old system was out-of-date (actually still using the factory cal from years ago) whereas the new system calibration was recent. The old system had drifted from the original calibration.
- At another customer, the old tester used an obsolete spectrum analyzer. We replaced it with a delta-sigma analog input card in the PC and computed the power spectrum in software. But the power spectrum measurements were different between the old and new testers. We connected a sinewave signal generator to both testers at the same time to show that the old system scaled the data as power spectral density which was not as we expected. We changed the software in the new system to scale as done in the old.
- The last example was at a battery manufacturer. Measurements for impedance in a battery were made by driving a small AC ripple on top of the batter DC voltage. We found that the impedance measurements were consistently different between old and new testers. Turned out that the old system drove a different current level into the UUT and had an analog input impedance about a thousand times less than the new system. Apparently, the battery had some nonlinear behavior in the UUT which caused the differences in the testers. A significant amount of time was spent understanding this behavior before agreeing that the new test system was doing its job properly albeit differently.
These examples illustrate the importance of understanding that the new test system will act differently than the old one and may even interact with the UUT differently.
Software Differences
Now for some recommendations on handling differences produced by the software. The biggest concern for software when upgrading an obsolete tester is when the original source code is not available. You don’t want to have to guess how the measured data is being processed and analyzed. So it’s clearly better if the old source code is available.
Let’s talk about the situation of when the code is available. You may still stumble right out of the gate. What do you do if the application was developed in an environment that is unavailable now, like an old VB6 app? You may have to go through some hoops to be able to use that source code. Eventually, you will get the source code in good shape and can open it in a modern development environment.
When that happens, you should develop some white box testing around the old and new code to make sure that the results match.
The hardest situation is when the source code is *not* available. What do you do now? In our experience, the best you can do is to reconstruct the software that automates the test steps.
- Search for all the documentation you can find.
- Look for information on the test steps or product assembly instructions.
- Find any documents describing the pass/fail criteria.
If *no* documentation is available, we’d recommend that you work with the manufacturing engineer and test operator to observe the old tester operation step by step to develop a new set of test requirements. And, as a word of caution, even if there *is* documentation available, we recommend you do the same thing simply to validate that any documented information is up to date and if not to update it as needed. In either case, you will want to run additional tests on the old system to understand it’s operation which will take time away from production. This situation is not ideal and you can almost guarantee differences between the old and new tester. But, with careful review, and detailed reverse engineering, even in this situation, differences can be reduced or maybe even eliminated.
Verification
After you’ve done your best to minimize the differences between old and new testers, how do you verify that they are both quote-unquote “close enough”? There are three methods that are used often.
Before following any of these methods, you need to be sure that both old and new systems are calibrated.
- At the most basic level, verify that both old and new systems obtain the same readings within some acceptable tolerance. This method neglects any data analysis algorithms that might be embedded in each test step, but for simple test steps which use raw measurement limit checks, this validation method is simple, and no UUTs are required.
- A more in-depth method will be to take a set of “gold units” and perform complete tests on them with both testers and look for pass/fail differences. Include some units that have known failures to validate that both testers generate the same pass/fail results. Note that this level of verification focuses only on the final determination of the pass/fail disposition, and not the underlying readings and processing that resulted in the pass/fail disposition, but for many testers all you care about is the final results and this method is good enough.
- A comprehensive method applies a Gauge R&R to that set of “gold units” on both testers. This level of validation is based on statistical analysis of the actual test data used in the pass/fail checks. Test System variations are separated from Operator and Part variations, so the statistical significance of any differences in the mean values between the old and new test data can be assessed.
Insight #5: The Importance of a Tech Refresh Plan

The last stress-reducing tip is the importance of having a Tech Refresh Plan. What is a Tech Refresh Plan? Essentially, it is a series of questions that guides you to understand 2 main topics:
- You want to understand the life-cycle of both the tester components and the products being tested.
- You want to review possible upgrade options.
If you already have test systems that are older than 3-4 years, you should do the review now, especially if the people involved in the original build are about to retire or otherwise leave their position – you don’t want to lose their knowledge.
Then, establish a cadence of around 4 years to review the test equipment using the Tech Refresh Plan as a guide.
What if you’ve already recently upgraded an obsolete test system? Then you should use the Tech Refresh Plan at that same roughly 4 year interval starting the countdown clock now. There are 5 main areas covered in a Tech Refresh Plan:
- Test System Usage
- Life Cycles and Spares
- Risk Assessment
- Upgrade Options
- Budget and Schedule
Check out our tech refresh plan checklist to fill in the details behind these topics.
A Tech Refresh Plan is a guide for the people concerned about longevity of the test equipment. The basic idea behind this guide is to walk this group of people through a set of questions that consider why the test system might be need to be upgraded, what components make the most sense to upgrade, how might you accomplish that upgrade, how are you going to pay for it, and when.
A Tech Refresh Plan should be done on a periodic basis so you can react calmly to any parts becoming obsolete. We recommend a cadence of around 4 years, starting now if you’ve never done one. Check out this tech refresh plan checklist to make sure you’re considering the major items. If you’ve got an obsolete (or soon-to-be-obsolete) test system and want to chat about options, you can reach out here. If you’d like more useful info on automated test systems, check out our resources page.
Deep into learning mode? Check out these resources:
- Test System Migration | Replacing Obsolete Test Systems
- Aerospace Test Bench Design – real-world insights
- How to Diagnose Failing Custom Test Equipment – process, causes, getting started
- NI Hardware Compatibility – real-world tips and lessons learned
- Tech Refresh Plan Checklist For Upgrading Test Systems
- Commissioning Custom Test Equipment – to do, process, gotchas
- How to prepare for when your test team starts to retire
- Practical manufacturing test and assembly improvements with I4.0 digitalization
- What to do with your manufacturing test data after you collect it
- How Aerospace and Defense Manufacturers Can Make the Assembly and Test Process a Competitive Advantage
- 9 Considerations Before you Outsource your Custom Test Equipment Development
- Reduce Manufacturing Costs Report
- Improving Manufacturing Test Stations – Test Systems as Lean Manufacturing Enablers To Reduce Errors & Waste