

Custom Manufacturing Test Stations – Top 6 Gotchas
When developing and/or utilizing a manufacturing test station.
There’re many things to keep in mind when developing and/or utilizing a manufacturing test station. Some things are more obvious than others, but all of them can create issues. Here are our top 6 gotchas. Below we’ll tell you why each one matters and offer some advice on what to do instead.
Gotcha #1: Noisy signals causing inaccurate test results.
Gotcha #2: Creating user prompts that your operators struggle to use.
Gotcha #3: Building an overly complex and expensive universal test station.
Gotcha #4: Not knowing what to do with your test data after you collect it.
Gotcha #5: Not planning for enough time to get rid of all bugs during development testing.
Gotcha #6: Assuming that you won’t need to update your test station once it’s in use.
The More Obvious Gotchas:
Overall we’ll be focusing on the less obvious gotchas, but here’s a quick review of the more common ones before we dive into the less obvious:
- Incorrect or incomplete specifications – many projects fail to be successful due to unclear or incomplete specifications. If you don’t clearly define what you want delivered, you most likely won’t like the end result.
- Not having test goals for your manufacturing test – Make sure you have clear goals on what the target yield, test time, and test coverage will be for the test. You could spend a lot of time developing a test without actually hitting your desired manufacturing goals.
- Ineffective automation of tests – Sometimes it may take longer to automate, or not be cost effective to automate, certain parts of your test. An example would be complex user interfaces or interfaces with too much manufacturing variance that might be better tested by a human. For example, it’s really hard to have a robot hit a button if the button varies in position on each device.
- Inadequate test coverage and unnecessary tests – It’s important to catch the manufacturing defects in test without having too little or too much testing. Too little testing and you may miss critical defects in your product that you don’t want getting out to your customer. Too much testing can also cost you time and money unnecessarily by having multiple tests verifying the same part of the device. The trick is to determine the correct amount of testing to verify your manufacturing by creating a test matrix. The matrix should identify what components you need to test and what tests are verifying them.
Gotcha #1: Noisy signals causing inaccurate test results.
| Problem: | Signal cross-talk causes noise on signal lines causing incorrect measurements. |
|---|---|
| Why it matters: | The additional noise on your signal lines can cause incorrect pass or fail test results due to incorrect measurements. |
| What to do instead: |
There are many complexities here, so you really want an expert involved. Some recommendations may include:
|
It’s quite common that test systems won’t work right due to noisy signals, incorrect voltage levels, or lack of signal conditioning. These noisy signals can cause inconsistent results in your manufacturing test, effecting yield or wasting time retesting or debugging failures.
Make sure all your physical wire terminations are done well. There shouldn’t be any loose wires or connectors. A lot of times physically inspecting each connector will quickly resolve signal issues. First look to make sure the connection appears to be ok. The most obvious thing to look for are wires not connected to anything. Inspect the crimp and make sure the area of compressed metal looks uniform with the wire inserted far enough into the connector to get a solid physical connection. Then physically wiggle the connector and wire to make sure that the connector does not come off, or the wire comes out of the connector. You can also observe your signals while doing this to see if it makes any changes in the signal. If it does, then you probably need to redo that connection.
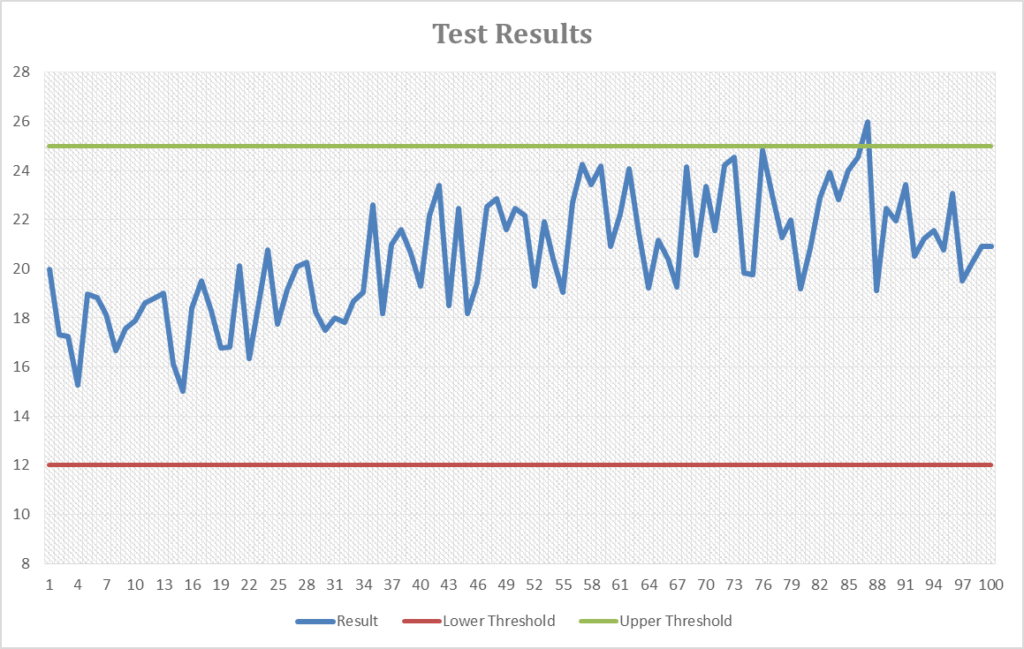
You can avoid noisy signal issues by making sure that you have well routed signals with signal conditioning if needed. Keep signal wires away from other wires that could induce noise on the line. For example if you are running low voltage signals near AC power lines you could see that AC power in your sensor data. Shielded and twisted pair wiring can help. Make sure to connect the shield to a solid signal ground. Avoid ground loops as well since they can cause inaccurate readings. Make sure that the path to ground is as short as possible with as little path resistance as possible. Ground loops can also be avoided by use of isolation transformers, optoisolators, or signal conditioning.
Read your sensor datasheet or manual to see if signal conditioning is needed to amplify, transform, and/or filter your signal for your measurement device. If it is not obvious from the manual if there should be signal conditioning, contact the manufacturer.
Gotcha #2: Creating user prompts that your operators struggle to use.
| Problem: | Overly complex user interfaces for operators |
|---|---|
| Why it matters: | An overly complex user interface may confuse your test operators. It takes too long to identify what buttons to hit or isn’t obvious what should be pressed, causing delays and errors. When operators don’t understand a user interface, they could cause false test results by entering incorrect data. This could lead to false failures and false passes. |
| What to do instead: |
|
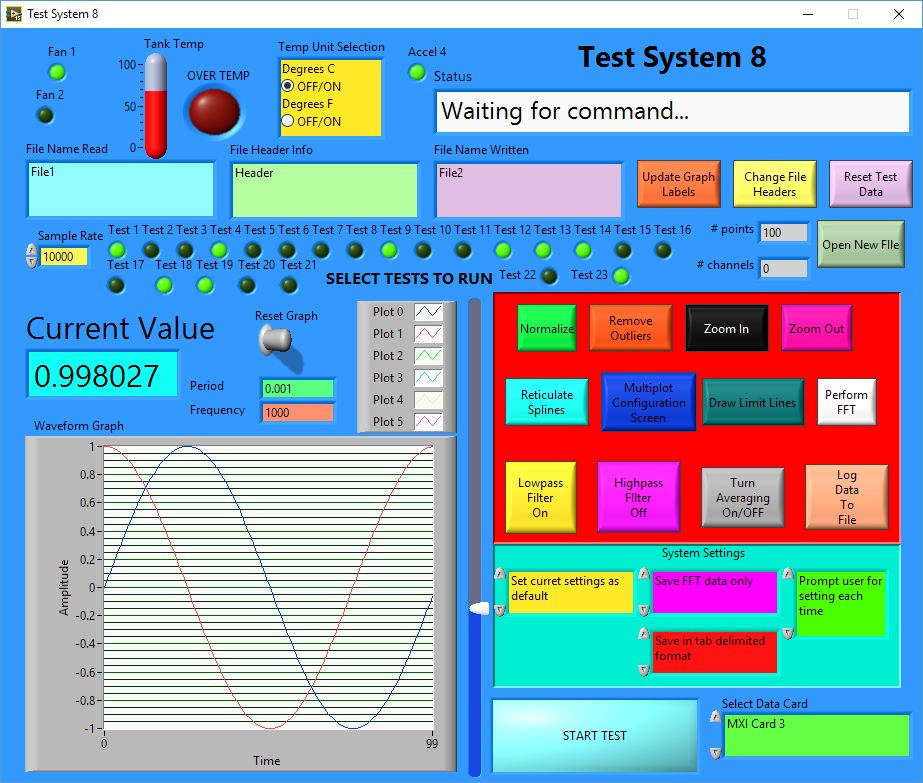
Figure: Example Overly Complex UI
Keep your target audience in mind. A good human-computer interface on your test station can go a long way towards keeping your test running well. Having a user interface that’s too complex or overwhelming can cause manufacturing test issues due to incorrect data entries or operator actions.
A common issue with user displays are overly complex display layouts.
It takes too long to identify what buttons to hit or it’s not obvious what should be pressed causing delays and errors. When operators don’t understand a user interface, they could cause false test results by entering incorrect data. This could lead to your device failing a test when it should have passed or worse yet, passing when it should have failed.
| Problem: | Operators not taking the time to correctly interact with user prompts. |
|---|---|
| Why it matters: | When operators ignore, or don’t understand a user interface, they could cause false test results by ignore instruction prompts or entering incorrect data. This could lead to your device failing a test when it should’ve passed, or worse yet, passing when it should’ve failed. |
| What to do instead: |
|
User prompts are often used to provide operators with instructions on how to perform tasks during a test. The test software then assumes that the operator did that test. But what if they didn’t? Well, that could cause improper device setup for test or a safety issue for the operator.
If the user prompt is a setup step in your test, you can add forced delays to allow them time to read it if the step is really critical. This could save you money and time! Especially if that operator misses an instruction that costs you hours of retest and debug time. That cost is much more than the additional 3 second delay you may put in an operator prompt to make sure the test is executed correctly.
Make sure to identify the skill set of the individual running the test and tailor the user interface to their capabilities. For example, if your operator is a skilled troubleshooter, then you may want to provide more controls for device manipulation. But that same layout may be overwhelming to another operator causing confusion, delays, and worst case, test errors. When designing a user interface we’ll try to put ourselves in the shoes of the operator and ask, does this display make sense? Is there anything we wouldn’t understand? Once a rough draft of the interface is created, run it by the actual operators. Get their feedback on how it can be improved.
Gotcha #3: Building an overly complex and expensive universal test station.
| Problem: | Thinking that a Universal Test System is always a good idea |
|---|---|
| Why it matters: | Of course a UTS can be great in the right scenario, but there are many hidden costs that make the UTS less appealing than multiple separate stations in the long run. |
| What to do instead: |
If you’re unsure if it makes sense to go down this path or not, perform a thorough analysis. This analysis should include the following less-obvious costs:
|

Building a universal test station can be a significant challenge both technically and financially.
Technically, the ability to test multiple products on the same test system can be hard due to the signal routing and fixturing needed to interface with all the different physical and electrical interfaces of the products. In a universal tester, multiple pieces of test equipment are needed and only a subset may be used at a given time. This can be mitigated with parallel testing but at the cost of signal routing and software complexity. The added station complexity can make servicing or troubleshooting issues with the machine harder. This could increase your system down time and increase your personnel cost to keep the system running.
Financially, building a system that can accommodate every device can be costly due to all the equipment needed to run the variety of tests and the additional switching needed to route signals. You may not even use all of the equipment in the station. You may have the best of intentions to someday use the additional equipment, but maybe your plans change and you don’t. Or worse, your device changes significantly requiring additional equipment to be added to the station increasing complexity and you still have unused equipment.
Once you have the universal test station together you may face some other challenges. Even though you are only using a fraction of the test system you will have to spend the time to validate the entire system and all the paths, something that can be very time consuming depending on the number of interfaces and how they need to be tested. Having a singular universal test station can be very expensive when the system goes down for unplanned issues. If and when the system does shutdown due to an issue, you will spend more time getting it back up and running due to the complexity of the system and you may not have another method of testing your product.
If you do end up building a universal test station and find yourself constantly making variants of your station, or not using equipment in the station for most of the test, then it might not be the most effective approach for manufacturing test.
It can be harder to keep a universal test station up to date. You could spend years and thousands of dollars developing your solution only to have it be obsolete once you are complete. Smaller scoped stations are easier to keep current.
A universal test station is kind of like being a jack of all trades but a master of none. It can do a lot of things fairly well, but not as well as a dedicated station for each test type you want to run. It would be like having to cut down a tree, open a can, and slice an apple. You can do all of these with a swiss army knife but having a saw, can opener, and paring knife may be a better solution. For example, you have a device with a LVDT, RVDT, and power output interface. A universal test station is built to test these three interfaces necessitating two pieces of equipment, an active load for the motor output and a power supply and DMM for the LVDT and RVDT. You start testing and realize that the active load and DMM are only used for half of the test. The rest of that time the equipment is sitting idle wasting time and money. The device or station may not allow for the ability to test using both pieces of equipment at the same time and making the station a multiple unit tester increases complexity and cost. Maybe it would have been better to make two stations. One for the LVDT and RVDT testing and one for motor output testing. This way the equipment is being used 100% on both stations while testing two different units, without adding hardware or software complexity. Now it may not always be possible to get 100% usage out of all equipment during test but it should be a goal.
Gotcha #4: Not knowing what to do with your test data after you collect it.
| Problem: | Collecting a bunch of data without having a plan for how to utilize it |
|---|---|
| Why it matters: | All that data you collected is very important for understanding, (1) how your device is performing, (2) how under control your manufacturing is, (3) any inefficiencies in manufacturing.
If you don’t have identifiers on the type of data being collected it could get mixed in with the data from unrelated tests. This makes it much more time consuming to analyze the data. You could also miss things in your data since you haven’t identified well. |
| What to do instead: |
|

We have often seen people put together test stations to collect data, but have no idea what to do with those test results. It’s important to think about what sort of information you want to derive from the data. Do you want to look at trends for power out on a unit, or missed or corrupt bits in gigabytes of digital data? Make sure you consider your data analysis goals before you finalize your test so that the data can be collected in a manner that facilitates the type of analysis you want to perform.
Not knowing what you are doing with your data after you collect it can cause multiple issues. If you don’t know what information you are targeting you may not construct your test in a way that collects that data. Determine the key metrics before you write the test to make sure that the information isn’t missed.
Organize your data in a scheme that makes it easy to retrieve later on. If you don’t have identifiers on the type of data being collected it could get mixed in with the data from unrelated tests. Using a common prefix when storing your data can help with this. For example, you may have two tests that record BERT values. If you name the test data BERT test for both it will be impossible to differentiate between the two. Instead you may want to add prefixes or unique identifiers. For example, 1.1.1 Uplink BERT = [measured BERT] and 2.1.1 Downlink BERT = [measured BERT].
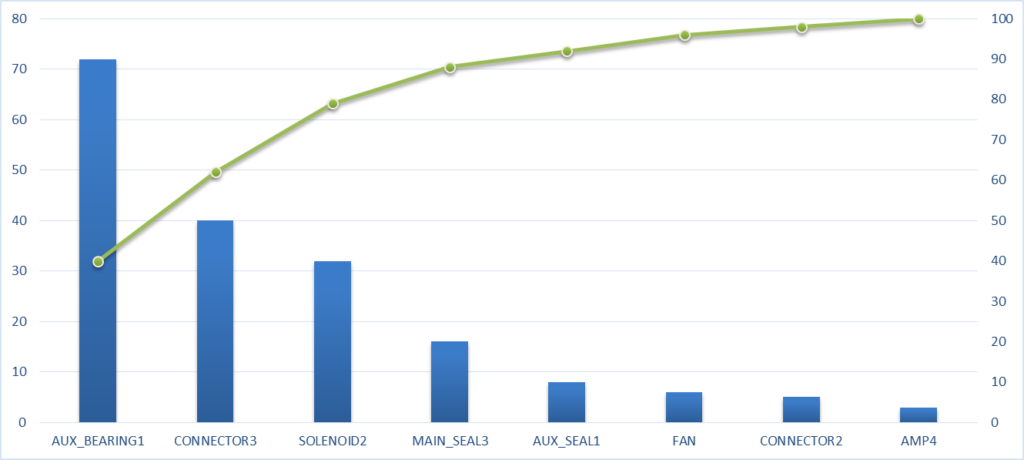
If your goal is to improve manufacturing efficiency by identifying your most frequent failures, you may want to create a pareto chart from your data.
This charting can only be done well if you store the data in a way that is specific enough to identify the failures. For example, saying serial communications failure isn’t as useful as providing the specifics of the failure such as unable to communicate due to no response, frame error, incorrect response, response timeout, etc. Having this level of resolution can really help when trying to slay these systematic issues with your test.
Using your data to drive manufacturing efficiency is important. We’ve worked with customers to reduce their production costs as much as 30% across multiple product lines. Check out this report for more information on how we did this.
Gotcha #5: Not planning for enough time to get rid of all bugs during development testing.
| Problem: | Treating debugging as the unloved member of the development family. |
|---|---|
| Why it matters: | Not allocating the resources (passion, tools, time) to address bugs causes undue stress on all parties involved in development. Developers feel the pressure of having to quickly fix the issue. This can cause them to miss the most efficient and robust solution in favor of the hack, leading to other issues popping up later on due to untested cases (possibly not until it’s in the customer’s hands).
It also matters because this is a huge deep learning opportunity for everyone involved, which can be utilized to strengthen the team and designs going forward. |
| What to do instead: |
Reset your mental model of the debugging process: infuse it into the core of development and make it enjoyable:
|

It’s very rare for a development to go so perfectly and not need any time to debug issues that arise during testing. You do your best to come up with the perfect solution, but when you test it you may run into issues. This imperfection should be expected and time should be allocated towards resolving these issues.
Not allocating time to address the issues causes undue stress on the all the parties involved in development. Developers feel the pressure of having to quickly fix the issue. This can cause them to miss the most efficient and robust solution in favor of the quicker dirtier solution, leading to other issues popping up later on due to untested fringe cases caused by the quick change. For example, we have an application where we are loading a data file into a DMA FIFO on a PC host application and sending to a FPGA target. That FIFO on the FPGA is then read into a DRAM memory block which is then read out later on to physical outputs. When running the test we realize that not all the data is coming out of the FPGA correctly. After some investigation it turns out we aren’t allocating enough time for the data transfer between the DMA FIFO to the DRAM in the FPGA. Well, the quick fix is to just put in a wait to give enough time for this transaction to take place. The problem seems be fixed. The customer then gets the system and after a few months finds an issue where the larger data file they are using isn’t generating the correct FPGA output. The same problem you saw earlier in your development but didn’t have enough time to thoroughly investigate. Now the developer has to travel onsite, spend time getting re-familiarized to the system, and debug the issue. This is much more costly than just taking the time upfront to provide more test and debug time during the development. If more effort had been allocated, a better solution could have been determined. Instead of putting in a delay, the system could look at the amount of filled memory blocks in the DRAM to make sure the entire data file was stored in the DRAM before sending out the data. This solution is much more robust and will accommodate any size data file, including detecting files that are too large to fit into the available DRAM.
Allocating time in your development schedule for adequate testing, debugging, and code review is an important part of manufacturing test station development. It’s much less expensive and stressful to be proactive and allocate time towards debugging than to be reactive and debug when the station is deployed and in use.
Gotcha #6: Assuming that you won’t need to update your test station once it’s in use.
| Problem: | Your test equipment is older than the building it sits in. |
|---|---|
| Why it matters: | Not keeping up with test equipment technology improvements can cost you time in multiple ways.
|
| What to do instead: |
|
As time goes on technology improves. New equipment comes out that has more capabilities than its predecessors. If the devices you are testing have a lifespan that is fairly long, you may run into issues with obsolescence of test equipment.
Not keeping up with technology improvements can cost you time in multiple ways. In one way the new equipment may be able to stimulate or measure your device faster than the equipment currently in the test station. By updating to the new equipment you can increase your throughput by decreasing your test time.
The other way it can cost you time is in the form of system down time. If a piece of equipment is obsolete and breaks, it may take a while for the equipment to be repaired. If the equipment cannot be repaired, it may be hard or impossible to find a replacement. It could also be just as expensive as, or more expensive than a new piece of equipment depending on the supply and demand.
When you update equipment be prepared to take time to justify differences in your measurements. The new equipment may be more accurate, have a different measurement method, or react differently to the UUT, causing a shift in test data. Understanding why the measurement is different is important when justifying that the test is operating correctly.

Engineering service providers can be great resources for avoiding these manufacturing test development gotchas so you can get a station that does what you want, when you want it! Are you considering developing a manufacturing test station? Reach out here if you’d like some help.