
LabVIEW OOP Example – Measurement Tool Chest
LabVIEW has supported Object Oriented Programming (OOP) since 2006
In my opinion, many OOP examples seem contrived or esoteric. Certainly they show the principles, but many times I ask who would ever use objects like these? Here’s an example that lets you construct a tool chest of measurement VIs, each of which can easily plug into a main application, allowing you select the measurement you want to perform. This architecture is most useful for anyone needing quick measurements for R&D, troubleshooting, and so on, or, in other words, anyone who works with measurement equipment!
LabVIEW OOP Measurement Tool Chest
One of the cool features of OOP that newbies can find confusing is class inheritance. The idea with inheritance is to define some common functionality that will be used across many class types and place that functionality in a base (or parent) class.
The application described in this issue uses inheritance coupled with dynamic dispatch functions (aka virtual functions or methods in other OOP languages such as C++, Java, and C#). These functions make inheritance even more confusing. However, you’ll see how these techniques are especially useful.
By the way, an OOP implementation of a Hardware Abstraction Layer (HAL) can use these techniques. In fact, a HAL could be combined with this example as an even more complete example of using classes.
In this issue, the overall layout of the classes will be discussed and then the implementation details will be covered in another issue. This example also uses VI subpanels, which many LabVIEW developers don’t use but are quite useful at times.
What’s A Measurement Tool?
Check out the following screen capture of the “Plugins” application while running.
Figure 1 – Application screen showing temperature measurement tool
The left side of the screen shows a list of tools that the user can choose by clicking on an element of the list. When an element in the list is clicked, the application uses information about that element to launch a special VI into a subpanel, located on the right side of the screen. In the case shown, a temperature reading is made and placed into a strip chart. Near the bottom of the chart are some configuration items for the type of thermocouple (TC) and the channel to which the TC is connected. At the very bottom of the screen are some buttons to save measured data and to stop the application.
The elements in the list on the left are called plug-ins. In this application, each plug-in is a LabVIEW class that is created in a certain way as defined by the parent class. We need each plug-in to act the same when “plugged into” the “Plugin” application.
Using Dynamic Dispatch with Inheritance
Any dynamic dispatch method defined in the base can be overridden by a method in an inherited class that has the same name as the base method. Thus, if you invoke a method ‘X’ in an inherited object, that method will execute. But, the cool thing about inheritance with dynamic dispatch functions is that you can cast an inherited object as a base object, connect that wire to the base object method ‘X’, but at runtime, the inherited method X will execute instead. So the compiler lets you place the base method X VI on the block diagram and the runtime engine will know the original class type and choose the proper VI to execute. It’s like a polymorphic VI that chooses the VI type at runtime!
Plug-in Design
Each plug-in needs the following capabilities:
- Initialize: an instrument might need to be configured and validated for use before making any measurements.
- Configure: the configuration performed by the initialization may need some default settings in order to have the instrument run properly.
- Save results: either the measurement, some analysis of the measurement, or both may need to be saved to a file.
So, we will need the base class to have dynamic dispatch methods for initialize, configure, and save. Right? Almost. The first two methods are easy to see how to handle. But the save method is more complicated because we don’t know ahead of time what types of raw and/or analyzed results will be needed. Plus, because the plug-in approach requires a VI to run continuously when loaded, we need a way to transfer data from the plug-in up to the app layer so the save method can be invoked or we need a way to tell the running plug-in that it should save its data. Either way, it seems we need a way to communicate between the app layer and the plug-in. For now, this application will use a message queue to tell the plug-in to save its data. A future version might implement this using a message class.
Application Highlights
Block Diagram
Here’s the overview of the plug-in application. The heart of the work is done when a new plug-in is selected from the list on the left side of the user screen. The following image of the block diagram shows the steps in transferring from the existing plug-in (at app startup, nothing would be running) to the new selection.
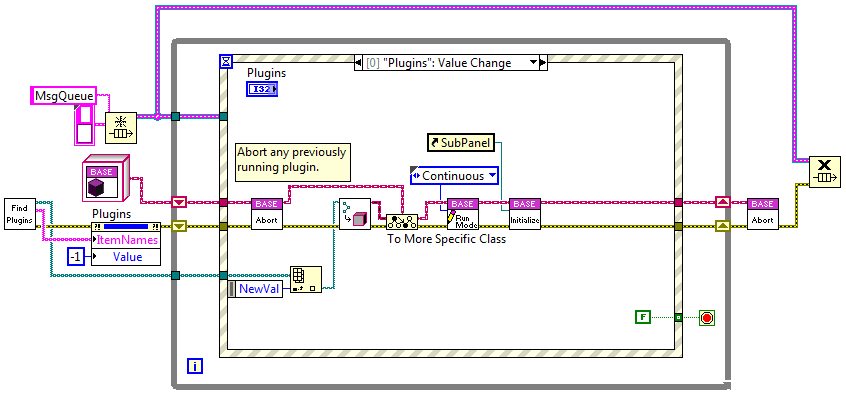
Figure 2 – Plugins application block diagram
Here are the steps. Only the event for ‘Plugins’ value change is discussed; the other events are trivial.
- All the plug-ins are found by scanning the ‘Plugins’ subfolder, located under the application folder, and finding all the .lvclass files. The base names of these .lvclass files are used to populate the plug-in list.
- A message queue is created named “MsgQueue”.
- A Base object is passed into the loop shift register for use while running the app.
- The loop starts.
- Any running plug-in VI is aborted.
- The path to the selected .lvclass file is passed to ‘Get LV Class Default Value VI’ to create an object based on this class definition.
- The new object is transformed into a base class object.
- The run mode of the object is set (to ‘continuous’ in this case – it is set to ‘TestStep’ when a sequence of plug-ins are executed automatically).
- The object is initialized and the plug-in VI is started.
When the stop button is pressed, an event that fires on “value changed” passes a ‘True’ to the loop terminal, the while loop ends, the plug-in VI is aborted, and the queue is destroyed.
Inheritance and Dynamic Dispatch
The code appears to use only the base class. The magic appears when an inherited dynamic dispatch method operates on an inherited class. Since we loaded an inherited class with the ‘Get LV Class Default Value VI’, any base class dynamic dispatch method will interpret the class passed to it as the inherited class. For example, when we select the Temperature plug-in, the base class ‘Initialize’ method actually runs the Temperature class ‘Initialize’ method. The decision about which specific method to call is performed at run-time.
One way to see that LabVIEW knows about all the inherited dynamic dispatch is to double-click on one of the base class dynamic dispatch methods. For example, double-clicking on the ‘Base Initialize’ VI in the block diagram above displays the following.
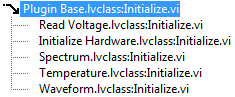
Figure 3 – Inheritance tree for Initialize dynamic dispatch method
All the “Initialize” methods derived from the base class “Initialize” are known. Thus, LabVIEW runs the ‘Temperature:Initialize’ when ‘Base:Initialize’ is passed a Temperature object. That’s very nice.
Message Queue
The message queue is used to pass information to the running plug-in. The ‘Save Data’ button causes a message to be placed on the queue. This queue element is then picked up by a loop in the plug-in VI and the plug-in data can then be saved accordingly.
Here’s an image of such a loop in the temperature plug-in.
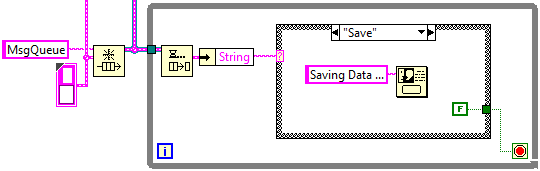
Figure 4 – Retrieving queue element from main app
In actual use, this message box would be replaced with something appropriate for saving whatever data is interesting to the user. Note that the queue is connected to that created in the main application by passing the queue name into the ‘Obtain Queue’ VI.
Screen Layout
This application also makes use of some screen layout elements that are not in common use.
The Plugins application screen is split into sections using Horizontal and Vertical splitters. Also, the subpanel container is used to display the plug-in VI front panel.
The subpanel and the splitter front panel elements are found under the Containers menu here:
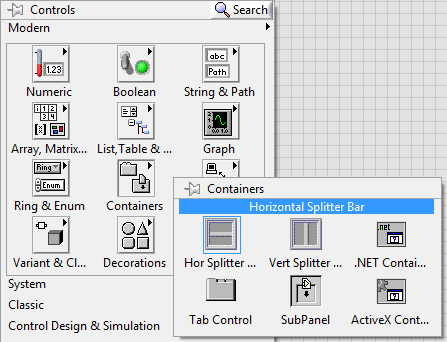
Figure 5 – Splitter container items
The right side is mostly consumed by a VI subpanel. For example, the Temperature plug-in VI looks as shown in the following screen capture. The figure above of the main application shows how it appears in the subpanel. Note that the Temperature plug-in VI front panel is also divided by a horizontal splitter.
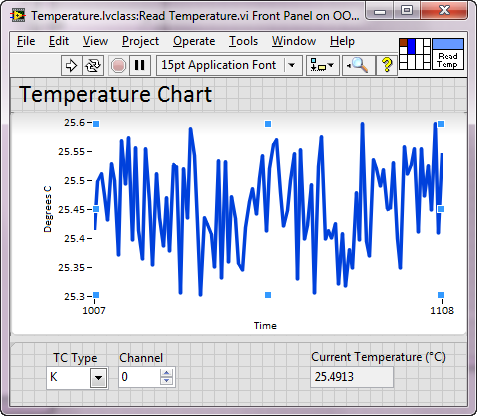
Figure 6 – Temperature measurement tool VI front panel
The bottom right of the main application screen is for the ‘Save Data’ and ‘Stop’ buttons.
The best reason for using all these splitters is that the size and placement of the indicators changes as the VI size is changed. You have to select the ‘Scale Object with Pane’ flag in the plug-in VI as shown next for the strip chart in the Temperature plug-in.
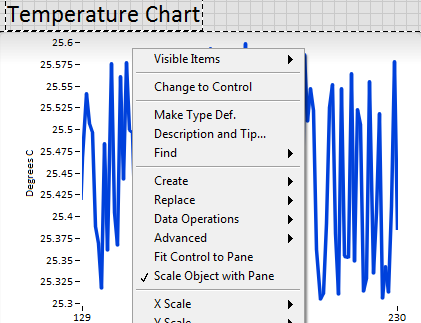
Figure 7 – Setting the Scale Object flag
The ability to scale with VI size enhances the usefulness of the app for users with different size screens or perhaps you simply want to make a graph bigger to look for some tiny disturbance.
Next Steps
By using OOP, a tool chest of measurement VIs can be bundled together. If you make a lot of troubleshooting or quick measurements, this took chest idea might be useful to you. But, even if not, hopefully this application demonstrates that LabVIEW objects can be used in meaningful applications.
If you’re looking for help with your LabVIEW-based system, check out our LabVIEW experience and reach out if you want to chat.
If you work for a US-based manufacturer and have a quick LabVIEW-based question, you can reach out to our LabVIEW experts to see if we’ve got a quick answer.
If you’re deep into learning mode, here’s some other useful resources:
- LabVIEW Test Automation – Custom Automated Test System Buyers Guide
- Which NI Platform is Right for Your Automated Test Needs? cRIO, PXI, cDAQ, sbRIO?
- 5 Keys to Upgrading Obsolete Manufacturing Test Systems
- 5 Considerations Before Selecting a LabVIEW Consultant
- LabVIEW OOP to Create a Class for the Measurement Tool Chest