
LabVIEW Data Logger Sample Project
The Sample Projects in LabVIEW are a great way to kickstart some common applications.
I want to review one of the built-in Sample Projects in LabVIEW. I learned about these sample Projects back in 2012 and presented a technical session on them at one of NI’s events back then. These projects are fairly sophisticated so they’re a good starting point for intermediate developers and can also teach novices some extremely useful techniques.
Let’s review the LabVIEW Data Logger Sample Project for continuous data acquisition. You’ll see that these Sample Projects may be a great starting point for your app, and you will likely learn some programming tips.
LabVIEW Data Logger: Sample Projects from the Start
The Sample Projects in LabVIEW are a great way to kickstart some common applications. Now, when you want to create a new project, you have the choice of apps for Desktop and cRIO if you have loaded this software. By the way, for those ambitious programmers, NI offers some rules to create your own project templates. See http://www.ni.com/white-paper/14045/en for details.
When you first open LabVIEW, the left side of the splash screen presents a button to create a new project.
![]()
Click this button, and you are presented with a tree of starting points. Choose the Sample Projects item, highlight Desktop, and then choose the “Continuous Measurement and Logging” item. (On my computer, the RIO stuff appears since the associated software has been installed.)
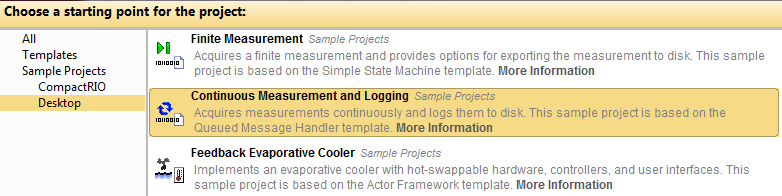
Figure 1 – Choosing the Sample Project
Complete the dialog boxes until the project window appears.
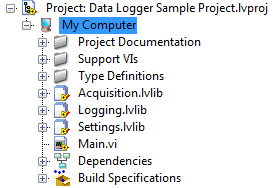
Figure 2 – Automatically generated project contents
You can see that this project is very complete.
Review the Sample Project Codet
Open the ‘Main.vi’ and look at the block diagram. There are 5 parallel loops in action:
- UI event handling
- UI message handling
- Acquisition
- File logging
- UI display
One important feature of all the Sample Projects I’ve seen so far is the extensive use of messages to communication between the loops and coordinate their activities. This Sample Project is no different. The Message Queue VIs are used everywhere. (These VIs are also useable in your own projects too, of course.) But, in addition, both a notifier and a queue are used to push around acquired data. Look at the following snippet, which is located in the lower left of the block diagram.
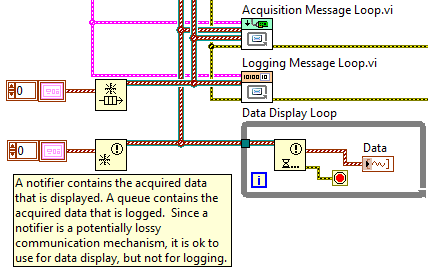
Figure 3 – Data handling loops
A cluster of message queues (the magenta wire), the data queue, and the data notifier are passed to the Acquisition and Logging VIs. These two VIs each contain a queued message handler (or sorts). For example, for the Acquisition VI, the messages are ‘initialize’, ‘start’, ‘acquire’, and ‘stop’, some of which are commanded by the main application loops and others by the acquisition VI itself. Here’s a little snippet of the ‘Acquire’ case of the Acquisition VI.
Figure 4 – Acquisition mechanism
Note how the Message Queue VI pushes the ‘Acquire’ message so this case will repeat itself until some other message is pushed into this message queue.
Also note that the data queue and data notifier (the two brown-ish wires holding an array of waveform data type) are passed into the “acquire” VI (that does the actual acquisition) to enable the data to be pushed into these two data containers. The data queue is picked up by the Logging loop and the data notifier is picked up by the Display loop. Both of these loops are shown in the “data handling loops” figure above and reside in the Main VI.
After the Logging loop has been initialized, it pushes a ‘Log’ message onto the queue to pull queued waveform data from the data queue and writes it to the selected file, as shown in the next snippet.
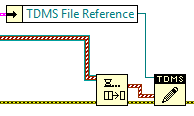
Figure 5 – Logging loop innards
The TDMS file reference is created in the ‘Start’ case of this Logging VI based on the log file base path selected during the application configuration and the date-timestamp existing at the time of creation.
Exiting the Application
The method used to exit the application is worth reviewing in a more detail, since there are many parallel loops, a situation that causes people to think about the best method to stop a bunch of loops gracefully.
A clue about how this app handles loop stopping gracefully is revealed by the creation of a user event. This user event is created when the application starts and is registered with the event handler.
Here’s the sequence of actions that happens when the user presses the ‘Exit’ button.
- The ‘Exit’ button press is picked up in the event structure.
- An ‘Exit’ message is placed on the Message Queue in the UI Event handling loop.
- The UI Message loop starts shutting down the other parallel loops and destroying the queues and notifier. All the main VI level queues are deleted and all the parallel loops are stopped. The only way to communicate back to the UI Event handling loop is via the user event, which is triggered here. Note that the loops are stopped either by noting errors in handles for the queue or notifier or by passing a True to the ‘while loop’ conditional terminal.
- The UI Event handler loop retrieves the user event, which is setup to stop this loop.
This method allows verification of proper closure of all parallel loop activities before the application is completely stopped.
Summary
The Sample Projects in LabVIEW have a lot of the architecture already competed. The data logger project reviewed above shows some of the sophistication available. These projects are a great starting point for many simple applications.
It is also worthwhile to compare the architecture in this datalogger Sample Project with the “CLD” datalogger application developed in the past several issues of this newsletter. You will see the near similarity of the design of the two dataloggers. The major difference is the use of an action engine and user event in place of the data queue and data notifier since the original data logger is software-timed with multiple data sources. The LabVIEW application would need rework to manage synchronization between multiple data acquisition loops, but if all acquisition can be fit into one loop, the LabVIEW app is a better design because of the data queue (i.e., lossless transfer). If you’re data logger or data acquisition system is getting more complex than you anticipated and you’d like some help, you can reach out here.