
Some Tips to Speed Up Industrial Embedded Product Prototyping
If you have not found an optimal platform, then you are likely working with tools that are functionally equivalent to your end goal but not in the desired form
Recall from the initial introductory post on the topic of improving Time to Market, I introduced three stages in a typical product development process: Design, Prototyping, and Development.
This post will focus on the Prototyping stage for industrial embedded systems.
I broke down this Prototyping stage into two major components. See the chart below for reference to all the stages. Two stages are grayed out to highlight the one covered by this post.
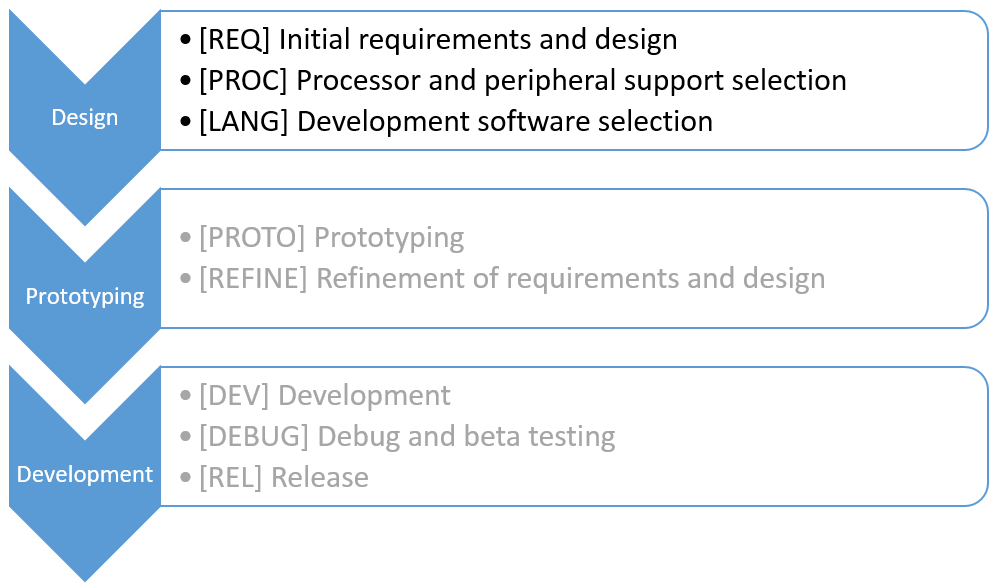
Variations of this chart have been included in all the posts so far.
Setup
Recall from the prior post on the Design stage that the hypothetical company already has a product out in the market which is electromechanical in nature (it interfaces to stuff like valves, motors, sensors, …). About a couple 100 of these units are sold per year.
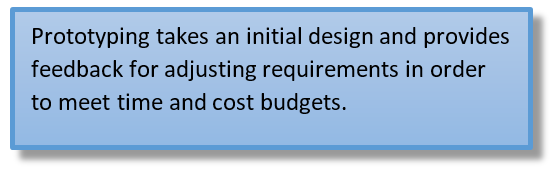
When entering this Prototyping stage, the hardware and software tools have already been selected in the previous stage and these tools need to be proven for basic functionality. The purpose of this stage is to design enough of the system that the team feels assured that all the requirements can be met with these tools. You don’t need to especially don’t or want to do the entire development in this stage – just enough to be confident that you can complete the development. Prototyping is entirely meant to reduce project risk.
Often, however, the tools either 1) can’t meet one or more requirements or 2) the time and cost of achieving those sets of requirements is onerous. This situation leads to a refinement step, where the design and tools are evaluated against the requirements and give-and-take adjustments are made to both the requirements and tools to assure that the design will meet all the needs of the product while staying within reasonable time and cost budgets.
Prototyping
If you have followed the tips in the post on the Design stage, you have found a platform which is an optimal combination two goals: 1) being closest to your end goal in form and function and 2) requiring the smallest amount of NRE development effort. The intent of these goals is to let you prototype the product on the same platform (hardware and software) that you will use in the development of the product. Or, turned around, if you prototype on a different platform (either hardware or software or both), then additional work is needed to convert to the product platform.
If you have not found an optimal platform, then you are likely working with tools that are functionally equivalent to your end goal but not in the desired form. In fact, this situation is perfect when there are too many unknowns in the design of the product, such as which actuators and sensors the controller will interface with, much less if your idea will work at all. (Maybe you are actually doing R&D instead?)
I’ve also seen some companies enter the Prototyping stage with little or no off-the-shelf hardware. These companies plan to develop the final form of the hardware before prototyping. This effort includes the design and layout of all the custom circuitry, connectors, power supplies, and so on. The justification is that they can say they prototyped the system in its actual final configuration. But there is risk involved in this approach UNLESS they have absolutely no question about the system working as required. But if there is no question, then they’ve essentially skipped the Prototype stage and gone direct to the development stage. In my opinion, this approach ignores the risk-mitigation benefits of prototyping. Prototyping before development is always the better method.
As mentioned earlier, the best plan uses an optimal combination of form and function closeness with a small amount of NRE. This plan likely takes pre-developed hardware (controller and I/O) in combination with a software development environment that natively supports this hardware.
Using this combination for the Prototyping stage will reduce the effort in either 1) designing your own custom circuitry in order to prototype or 2) having to morph the prototyping hardware and software into the form you need for your product.
To get a sense about the savings available with such a combination, I’ve included the bar chart from the Design stage post to show my estimated time/cost savings for the hypothetical project. To achieve these savings, I chose the VERDI platform. It is based on the NI SoM RIO controller that will be used in the product. I can also obtain all the off-the-shelf I/O that I need for the product (e.g., thermocouple input and 24 V digital output). Finally, the system supports LabVIEW for software development.
Consequently, since the PROTO step will be done on the same platform as the product, there won’t be any additional hardware and software changes in the Development stage, which minimizes the risk that any updates to design and requirements will affect the end product.
For the cost/time savings in the PROTO step, I’ve estimated 50% of the effort that would have otherwise been spent if the platform chosen for prototyping used that was different than the one used for development. See the bar chart for details.
Peeking ahead, note in the bar chart that I spend a nearly as much time in the PROTO step as in the DEV step (in the Development stage). This level of effort in PROTO is not uncommon if you want to be really confident that there will be no surprises in the Development stage. (“What!?!? … I can’t do that???”.) Specifically, I want to spend effort to clearly identify and justify any changes made in the REFINE step.
Refine
Based on the outcome of the PROTO step, I’ve included time for the REFINE step to make adjustments in the requirements and design (in both software and hardware). With those adjustments made, the team can be confident that the project can be completed in a reasonable time and cost with the selected hardware and software.
Since this refinement step is needed regardless of the prototyping platform choice, there is no time/cost savings to be had in the REFINE step. See the bar chart for details.