
Some Tips to Speed Up Industrial Embedded Product Design
My recommendation? Look for a platform that uses components close to the same physical form of your end goal
Recall from the previous post on the topic of improving Time to Market, I introduced three stages in a typical product development process: Design, Prototyping, and Development.
This post will focus on the Design stage.
I broke down this Embedded Design stage into three major components. See the chart below for reference to all the stages. Two stages are grayed out to highlight the one covered by this post.
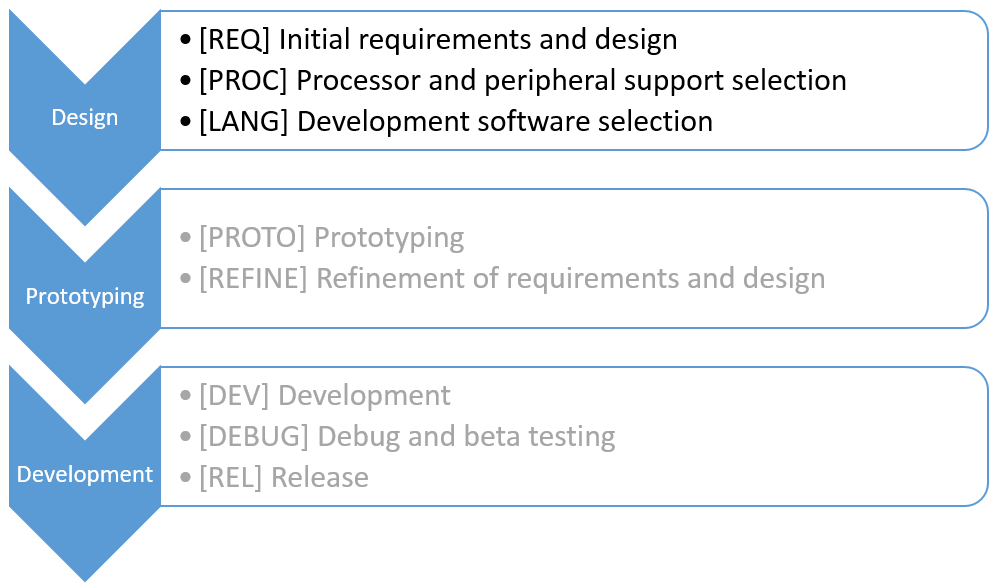
This chart was taken from the previous post and modified to add some labels, such as “[REQ]”, for quick reference to the specific items. (Also, I changed “language” to “software”.)
Setup
To make this post (and subsequent posts on this topic) more relevant, I have in mind a hypothetical project for a company that already has a product out in the market. This embedded product is electro-mechanical in nature, meaning that it needs to interface to stuff like various sensors (voltage, temperature, …), valves, motors, and so on. The company expects to ship a couple 100 of these units per year.
The existing product needs to be upgraded due to obsolete or hard-to-get components. In addition, the product needs a refresh. For example, the present model has no Ethernet port for data downloads or remote operation. Some other user interface and operational features need to be added as well.
The point is that the company already has a good starting point for requirements, based on the existing model, for the upgraded product. Contrast this situation with a completely new concept which has a blank whiteboard just waiting for requirements. Clearly the time expended on requirements gathering on the upgrade will be less than for a brand-new product.
With this hypothetical project in mind, refer to the chart below, which shows time spent on the project relative to the time reduced by using ideas and tools I will recommend in this post.
The “%Effort” bars show the estimated time using the recommendations in this blog series. The “%Reduction” bars show estimates for the additional effort it would take if the often-traditional approach is used. The “%Effort” bars sum to 100%. The “%Reduction” bars sum to an additional roughly 90% more work.
Requirements
The project engineers need to know what they are building. The sales and marketing team needs to know what they are trying to sell. So, the company needs to document the product requirements. I can’t think of any good tips on reducing this effort – it just needs to happen. Hence, the REQ step has no bar for reducing the effort.
Processor & Peripherals
Proper choice of processor and peripherals can certainly save time and effort. Familiarity of a processor and all its support tools has a large effect on making the product development cycle shorter. This choice can be very complex and time-consuming because there are so very many options. The choice of peripherals is large too. Deliberations about mixing and matching all these items with all the pros and cons takes considerable time.
However, if you consider a solution based on a processor board with many peripherals already designed in, much time can be saved. One such solution is the sbRIO board from NI.
Almost certainly, the unit cost price point would be higher for this “pre-developed” approach, than a board you spin completely anew. However, our hypothetical product contains so many other costly components that it makes sense to emphasize getting the upgraded product to the market sooner than to shave say 50% off the price of the controller alone (i.e., which contributes maybe a couple % of overall system cost).
Find a platform that is closest to your end goal in form and function that also requires the smallest amount of NRE development effort.
The same is true for analog, digital, and other I/O boards. Using “pre-developed” I/O hardware will speed development.
Going down this “pre-developed” path is tried and true. One that addresses enclosure and connectivity needs, is the Compact RIO from NI. This platform is robust, industrial, and solid. But note that this hardware is typically the most expensive option.
Among the maker-movement, which certainly has strong market-direction influence, are the Arduino and the Raspberry Pi platforms each with pre-developed controller boards and I/O hardware. Unfortunately, these “maker” solutions may not be robust enough for industrial applications.
My recommendation? Look for a platform that uses components close to the same physical form of your end goal. One example is the PC/104 standard. Utilized for decades (i.e., since 1992), it has now evolved to support the PCIe bus. Another option worthy of consideration is the VERDI platform. VERDI offers pre-developed I/O hardware and uses the NI SoM RIO for the controller.
Obviously, when choosing a “pre-developed” controller and associated I/O hardware based on off-the-shelf components, you trade off higher unit costs for lower non-recurring engineering (NRE) development costs. So, the best tip I can make is to find a platform that is closest to your end goal in form and function that also requires the smallest amount of NRE development effort.
In the bar chart above, I’ve chosen an NI processor (SoM RIO) which has a lot of the connectivity I need. By using this off-the-shelf product, I don’t have to spend a lot of time searching for all the parts. I’ve spent an estimated 30% of the effort that I would have had to otherwise spend researching all the options and support component parts.
(When I wrap-up this blog series, I’ll show you an illuminating diagram that summarizes platform choices in a way that nicely captures the evolution of a unit costs as each year (hopefully) brings higher sales volumes which allow unit costs to be driven lower. This chart really drives home the need to start with components close to the end goal. Stay tuned.)
Development Software
Obviously, the OS and development software have to be compatible and well-supported with the controller and I/O you select. Yes, there are lots of options here too, but most of the choices quickly settle into Windows vs. Linux, for the OS, and text-based vs. graphical programming, for the development software.
Linux is more prevalent in the embedded market place, but interestingly Microsoft is making significant progress their Windows IoT Core aimed at Arduino, ARM, RasPi, and other “tiny” platforms. This effort is an outgrowth of the Windows Embedded platform Microsoft has had for many years. Microsoft also has Azure, a full-featured cloud platform. So, you have choices.
Much of programming software choice is seemingly based on almost religious reasons (i.e., either you believe or you don’t), and this preference may so strong as to even drive your hardware selections.
…the graphical approach is generally faster to develop and easier to debug.
Nevertheless, based on experience using both text and graphical languages, my recommended tip is that the graphical approach is generally faster to develop and easier to debug. Hence, I generally prefer LabVIEW. I recognize that this choice drives me toward NI hardware solutions, but the tight integration between the software and hardware is also a bonus in reducing Time to Market, as compared with combining disparate hardware and software solutions offered by separate companies.
In the bar chart above, I’ve chosen LabVIEW which provides the development tools that I need. Also, since LabVIEW works with the SoM RIO hardware platform, I don’t have to spend a lot of time making sure that my software tools will work with my hardware. I’ve spent an estimated 50% of the effort that I would have otherwise spent researching OS and software development SDKs. If you’re interested in learning more about industrial embedded systems, check out our resources page.